General Info[ | ]
Armies are represented on the map similar to Agents, but fly a flag proportionate to their strength in numbers - but though they appear on the POI they are almost always on a different operational level than the agents. Armies and Agents/Heroes rarely directly interact, as an Agent is meant to be traveling generally in stealth (unless you're burning down a village of course) so Armies and Agents can peacefully cohabit a square.
Armies are a collection of generic unit types that act like hitpoints, but the tactical strengths are determined by Elite Units that control the flow of battle. Battles play out over multiple turns, and can even stalemate for a very long time in a single POI (with devastating consequences for the locals of course). Elite Units are not necessarily deployed in every battle, choosing which ones to use and when to use them is part of your overarching strategy. Winning a battle in one round may be possible by unleashing your elites, but that may lose you the war. Outside of killing the enemy, morale plays its part - letting loose your horrors on the battlefield may inspire otherwise brave men to return to the life of a farmer.
War is supposed to be a side-note to the game of intrigue being played out across the world. It is very lightweight on the player to move armies around as there are only several small intersections of POIs that can possibly make up a front, and all units can generally move 2-3 spaces. They play a part in machinations even while existing on a separate level – it is possible to throw forces into the grinder just to distract the Kings of the Realm while Agents complete a powerful ritual.
Even though it is not the focus of the game, tactical gameplay is important enough to be able to focus on this element and find an enriching strategic experience - which can be found through the use of Elite Units as well as pinning/flanking enemy armies or making strategic sacrifices to achieve significant goals elsewhere (locking down a force while burning the crops of an already starving nation).
In general Army Combat plays out over multiple turns and involves locking down armies on POIs. The battles themselves involve the strategic use of Elite Units and choosing the proper approach for your overall strategy. Flanking pinned armies is a major part of the high level strategy as is cutting them out of supply from their homelands. However, it's much simpler than most systems that have these functions because of the limited movements that POI's offer vs traditional hexes.
Army Layout[ | ]

The Basic Army View
Here we see the Commander of this army, its name, what it is doing, its Initiative (number in the upper right), the skill of the commander (large number near commander portrait), how many basic soldiers it has, and its elites. These are the "at a glance" figures the player will need to know.
Commander - Commanders are critical to the success of any army, their Command skill adds massive bonuses for combat and effects training and loyalty. A corrupted commander can be also be your strongest ace in a war. The commander portrait also dynamically depicts morale of the army.
Initiative - Armies lose initiative as they grow larger meaning they move slower and are less able to catch fleeing armies, and are easier themselves to be ambushed. High initiative can be particularly painful in rough terrain.
Basic Soldiers - An army can have up to three kinds of basic soldiers though most will have only one. Basic soldiers are effectively the "hit points" of an army, and as they deplete the army grows increasingly more fragile. Basic soldiers are also prone to fleeing, and if they rout after a particularly disastrous battle you will have drastic casualties. Below the basic number of soldiers you'll see another number, this indicates the wounded soldiers being kept with the army. Wounded soldiers increase initiative and slow down the army, but may heal if tended to. Invisible to the Basic Soldier number there are also soldiers becoming Veterans - these veteran soldiers can be used to replenish your absolutely critical elite units.
Cost for an Army - Armies are very simplified in the system - manpower and composition are determined by government and cultural values as opposed to maintenance costs and build orders. Each raised army costs 1 gold and 1 food a turn, as does each Elite Unit. Initial recruitment as well as repair costs iron. Armies are assumed to be foraging and any forays into more barren areas will increase cost of supply for the army. I anticipate some people will question our choice of a simplified resource system for armies but it GREATLY increases our ability to make a realistic AI.
The strategic or tactical system is not completely finished yet as KDG are still unhappy with the battle screen but it should be added soon.
Elite Units[ | ]

An Elite Pikemen Unit
Elite Units - Elite Units are how you specialize an army. They can break through enemy lines or hold off deadly attacks - some can assassinate enemy commanders or negate penalties for attacking over rivers or other dangerous terrain. Each elite unit is unique and has its own history in the world. Elite Units take a very, very long time to train and replenish themselves only slowly. Knowing when to unleash your elites is important if you are aiming for a military victory.
Here we have an elite Pikeman unit with its statistics and abilities. The named and numbered statistics determine the basic abilities of the Elite Unit, and while these are generated from default values for "Pikeman" they are then altered by the culture and training level. The special abilities of the unit are posted to the right and in the case of Pikeman it is "Spearwall" which protects against many powerful special attacks. You can change tabs to see any current or past heroes serving with the elite unit as well as a history tab showing the kills/deaths for the unit, any major battle they served in, and a field for you to input your own notes. Clicking the "gear" will let you change the name to something more fitting - many of our dynamic names are pretty terrible at this point.
Many of the actual statistics oppose one another when in battle. Shock vs Formation and Horror vs Discipline are both attempts by the attacker to "disrupt your lines" - success here may trigger additional follow up abilities and at the very least will weaken the counterattack of the disrupted unit. If formation breaks then Melee damage is used to inflict casualties on either side and a "breakthrough" event may occur. Skirmish and Siege are both used in those specific situations, and Health and Will are the overall state of the unit. As the unit weakens its stats decrease to reflect its weakened state.
Battles[ | ]
Battle Screen[ | ]
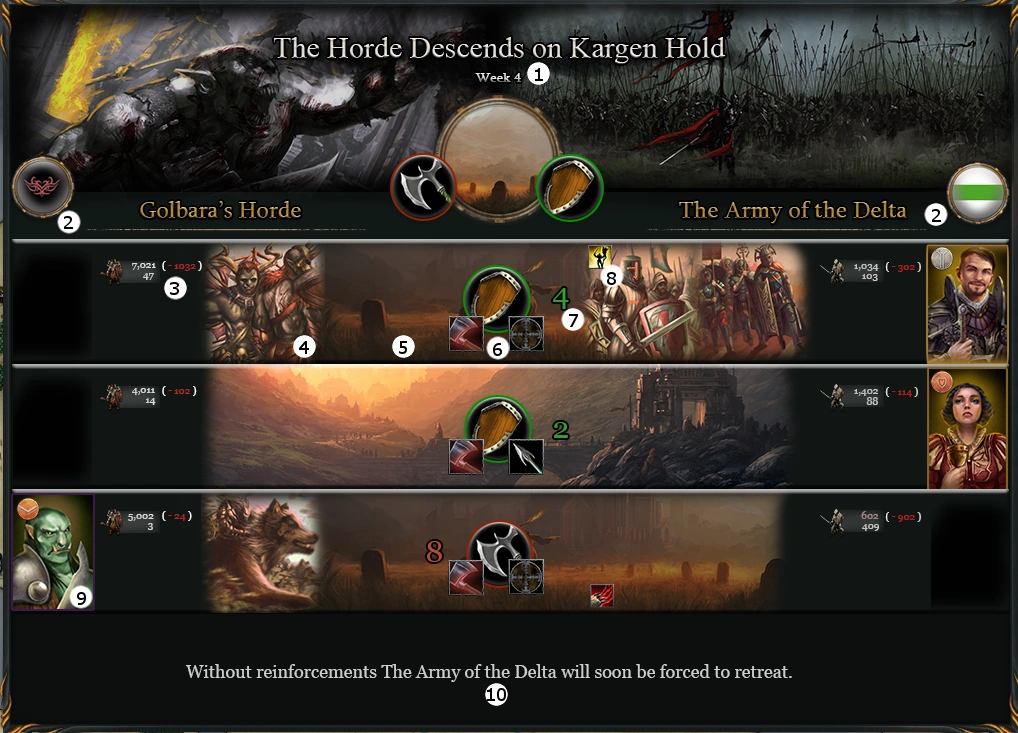
The battle screen.
The screen to the right shows an example of a battle. At the top (1) you can see the name of the battle which is randomly generated based on the participants and the location. It also shows how long the battle has lasted, in this case four turns (weeks). The central circle indicates the dominant terrain type and the axe and shield show which side is the attacker and defender.
Also shown in the top quadrant are the names of the armies, the shields representing the nations involved (2) and a graphical representation of the armies.
The following three sections show the three corridors of a battle, representing the centre and flanks of the armies. Number (3), right next to the miniature soldier, shows the size of the army at that corridor, with the top number representing the troop count, the bottom the number of wounded and the red number the losses during the last phase of the battle. Each corridor contains not only normal troops, but may also contain Elite Units (4). As you can see the top corridor contains one set of Orcish Elite units and two sets of Human Elites, the bottom corridor contains only an Orcish Elite.
The background image of each corridor (5)shows its terrain type, in this case the top and bottom ones are plains, while the middle is a ford.
The two icons to the left and right of (6) represent the tactics both sides are using. The number at (7) shows which side is currently having the advantage in battle which is also represented by the Shield/Axe symbol in the middle.
Elite Units can confer advantages and disadvantages on their own troops or on the opponent's, these are represented by icons at the top or bottom of a corridor (8). To the far left and right of the screen (9) the commanders of each corridor are shown.
Finally, the overall indication how a battle is going is shown at the bottom (10).
Most of the information for combat is obfuscated and presented through both tooltips and clicks to additional menus depending on the level of infiltration you have over the concerned parties. At the most basic level you may not even be able to see the names of the Elite Units present in the battle whereas if you had infiltrated one of the Commanders you could not only see all of the information but also influence the strategies being utilized in the current battle. Another aspect of display is the "concealment" of default conditions - meaning that we highlight crises as opposed to dump the entirety of information. A corridor with crumbling morale will pulse, if a breakthrough is likely to come soon then the advantage icon will be pulsating. Any player wishing more information displayed by default can enable it in the settings and grids with the numerical values are displayed next to the relevant section. Enough about what you "could" do, let's talk about the battle and how it resolves.
There is no single list of actions - everything is tied to active context. The area at the bottom of the menu by default shows a brief summary of the battle (or expectation), but when you click on a commander, elite, army, or hero you control/infiltrate you will see a list of actions at the bottom.
Battle Mechanics[ | ]
Battles (in war) take place ON a POI over the course of many turns, this is much different than most strategy games which tend to have either battle as a part of movement or immediate resolution. Depending on the POI you'll find from 1 to 3 battle corridors, generally representing the center and flanks. These can have different terrain types that vastly impact the battle. In the screenshot shown you have two "plains" and a "ford" - plains allow 3 elite units each and are ideal for fast moving units like cavalry. Fords on the other hand allow only a single elite unit (+ flying units) each and give a substantial bonus to an unflanked defender.
Armies will by default split their forces to cover all possible corridors, while multi-national armies will assign separate armies to each flank. In the case of attacks from multiple sides the defending force will have multiple concurrent battles and need to select from its reserve which battles to assign its forces to.
There are a lot of calculations involved to determine who is winning in each corridor but you will always have the at-a-glance simplified value representing if the attacker or defender presumably has the advantage. Now this number is not necessarily accurate but it generally reflects a multiplier (10 losses to 1) given an exact exchange in battle. However there are many smaller factors that can derail that as well as some fundamental uncertainty.
Each corridor has a tactic being employed which is represented by the icon next to the advantage icon on the corridor. The purple axe that the orcs so greatly favour represents "Total Assault" which is essentially human wave tactics - it will reward you greatly if you break the enemy lines but if you fail to do so you will take much greater casualties. The human kingdom on the other hand is Defending on both flanks and Skirmishing on the ford. There are a total of six tactics and proper selection can save or lose a battle though the choice is often weighted in favour of strategic concerns. Often you'll want to stall the enemy army and choose all defense even if you could deal more casualties with a different tactic. Corridors are also capable of being affected by rituals, spells, and even some Old One powers that will alter the conditions of combat there.
Commanders will take charge of a corridor when possible, the better their skills the more likely they are to achieve a breakthrough or combat opportunity. Command directly adds to breakthrough chances and there are many traits that add to particular statistics or even augment breakthrough results. Elite Units are the great equalizer of That Which Sleeps. Deploying an Elite Unit always come with the risk of its injury (they take a long time to replace) but their abilities can turn the tide of battle. In the picture above we have Orc Champions deployed against Crusaders and Heavy Infantry. Orc Champions are your standard line-breakers for the orcs - they have a bonus to cracking mundane infantry units and are your best hope at winning a basic battle. However, Heavy Infantry by default cancel any anti-infantry abilities neutralizing them. Meanwhile the crusaders, outside of giving a sizeable bonus to attack, provide the status Zeal which causes half of your wounded each round to instead return to combat. Good statuses are shown at the top of a corridor, negative statuses at the bottom. Speaking of negative statuses, at the bottom you can see the the Warg Riders have done a number on that flank - the condition you see is "In the Wake of Beasts" which comes into effect if they break a line, it renders the line permanently broken essentially turning that corridor into a melee-only combat zone. Very useful, but beasts are weak to plenty of Elites as well as heroes and effects like fire.
Battle continues until one side retreats (not a bad result) or is routed (generally terrible for the routed army) - you increase your chance of routing the enemy if you take out their flanks and accomplish a double envelopment (much more likely if the enemy center is aggressively attacking). Armies can retreat behind the walls of cities and castles requiring a siege which we will go over in another post.
Breakthroughs result when you have managed to break through the lines of the enemy army - this will often "reward" you with the ability to either apply pressure to another corridor, attack their reserves, or perform an action special to that elite (for instance if you cause a breakthrough with an Assassin tagged Elite Unit you will have the opportunity to eliminate the enemy commander). Certain units can almost always force a breakthrough but these are generally your more difficult units to acquire and also each time you deploy an Elite the AI will track its usage to determine its own training and recruitment needs.